|
||
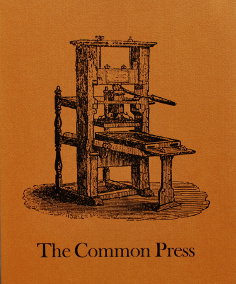
| The Wooden
Common Press is introduced on the
previous page. This page begins the adventure of
making one ourselves, here at The Excelsior Press
Museum Print Shop, aka The Wooden Nichol
& Excelsior Press Works. |
||
| During
the mid-1980's. The Smithsonian Institution
made plans to reproduce the Wooden Common Press in it's
collection. As they did it, Elizabeth Harris and Clinton
Sisson documented the process and published the details -
as well as 8 large pages of detailed construction
plans in their book "The Common Press". We have
studied this book as well as the work of Jeff Groves and
The Colonial Heritage Society to learn how to build a
Common Press that would have been used in a London
Printing Office of 1750, as was the one in the photo
below. The press we build will not be a museum replica like the presses we have studied. Ours will merely be a prop for the musical "Amazing Grace" as it tours the United States. Although our press may not be made to the exacting standards of the original and other reproductions made by others, it is with the spirit of accurate replication that we began this project. 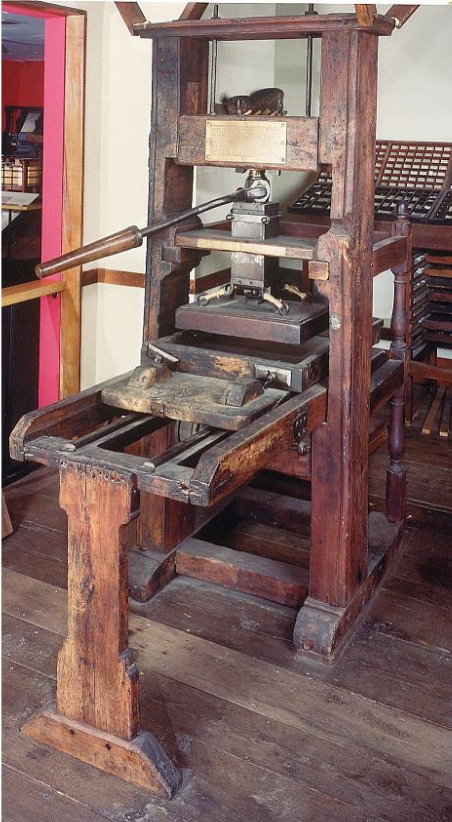  We also studied this popular 1:10 scale Model of a wooden Common Press from our collection, however, we also discovered major discrepancies between the model below and the press above. Further research has shown that there were many minor variations in how these presses were built over the years and by different press makers. When a question arises, we have deferred to Clinton Sisson's drawings as well as our own interpretation of how it might have been done in 1750. We also, I must admit considered the options available under such a tight production deadline. 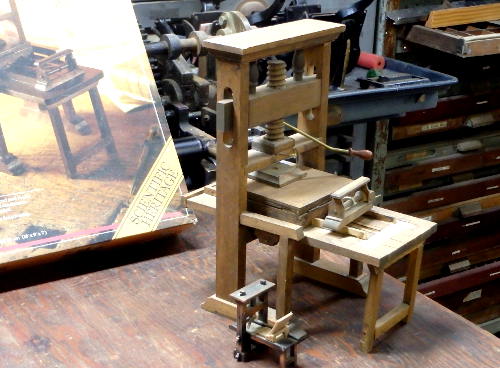 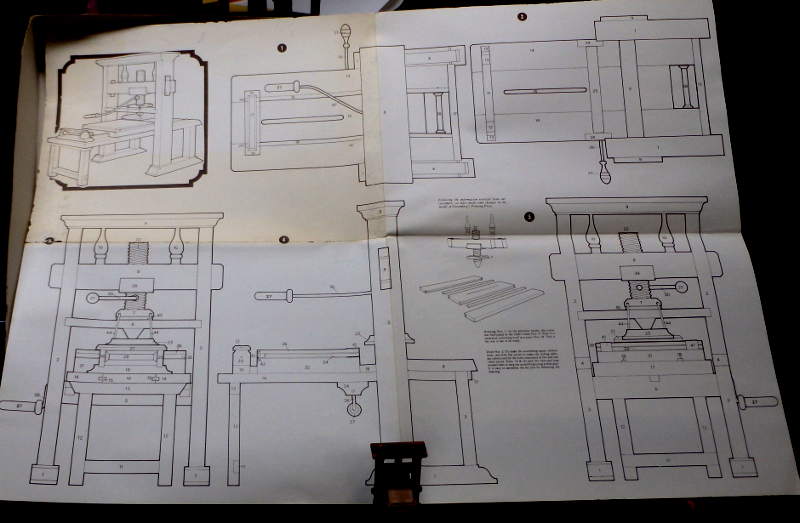 This model of the old common press has been available for many years - from many different makers - as a 1:10 all-wood scale model. Sometimes it is promoted as "Gutenberg's Press", "Ben Franklin's Press" or, here as a "15th Century Printing Press". They are all about the same, however, since not much was done in press design between 1450 and 1780 besides the evolution of Gutenberg's wooden screw to the steel spindle design which is documented as having been used at least since Stephen Daye printed in New England during the mid 1600's. So. We begin We begin by studying the resources available and by learning from others' experience. Even before The Book arrived, we had found and studied Jeff Groves online reports on his replication of Isiah Thomas' Common Press. When the book did arrive, we read it through pretty quickly, having discovered much of the same information in Mr. Grove's excellent .pdf files. Later on, we were directed to the extensive report by the Colonial History Foundations experience in building their replica of Isiah Thomas' press. (See links below) which confirmed what we had learned already, but explained some complex details that made the study quite interesting and enlightening. The first step was to find the lumber. This was a lot more difficult than I had first expected. Everyone I spoke to, and every reference I found used the term "seasoned lumber" Elm was used in England in 1750, but "seasoned oak" seemed to appear in any reference to replicas built in America. I did not at first fully comprehend the problems involved in finding just the right wood for the uprights. In the end, we were forced to forgo the initial plans of using "seasoned oak" and decided instead that there simply was not enough time available to procure the recommended wood for this press. We instead chose to use Oregon Douglas Fir - a softwood, but a strong one. Easy to work with and lighter by far than the more desirable oak, so the press will be lighter, and therefore easier to move and transport. The Doug Fir will not be as strong as the oak, but this press will not be printing full page newspaper forms. It is a prop. The bed will slide in beneath the head when the rounce is turned, the platen will descend when the lever is pulled, and pressure will be applied. Not as much pressure as with the original Elm or Oak designs, but enough pressure at least that we will be able to print a sheet. We'll see how that goes towards the end of this adventure. Beginning Construction (August 28)  We are very fortunate to be friends with a
skilled cabinet maker - Paul Nichols - who also finds this
to be an interesting project. Yesterday, we went to the
lumber yard - Tinsman Lumber - along the Delaware River in
Lumberville, Pa. Tinsman is the oldest
continually-operated lumber yard in the country. We were
served by Mr. Tinsman whose forefathers established the
business in 1780 - not long after "our press" was made. We are very fortunate to be friends with a
skilled cabinet maker - Paul Nichols - who also finds this
to be an interesting project. Yesterday, we went to the
lumber yard - Tinsman Lumber - along the Delaware River in
Lumberville, Pa. Tinsman is the oldest
continually-operated lumber yard in the country. We were
served by Mr. Tinsman whose forefathers established the
business in 1780 - not long after "our press" was made.
We returned to Paul's shop, where he laminated and planed the 2" "dimensional lumber" we had purchased. Soon, we had two beautiful 5x7" uprights to be used as the "Cheeks" of the press. Shortly thereafter, we had the frame seen in this photo. Next will come the plank, bed and coffin. And then the Rounce to crank the form in under the head for printing. But that will be a bit longer. New photos when they are ready.... 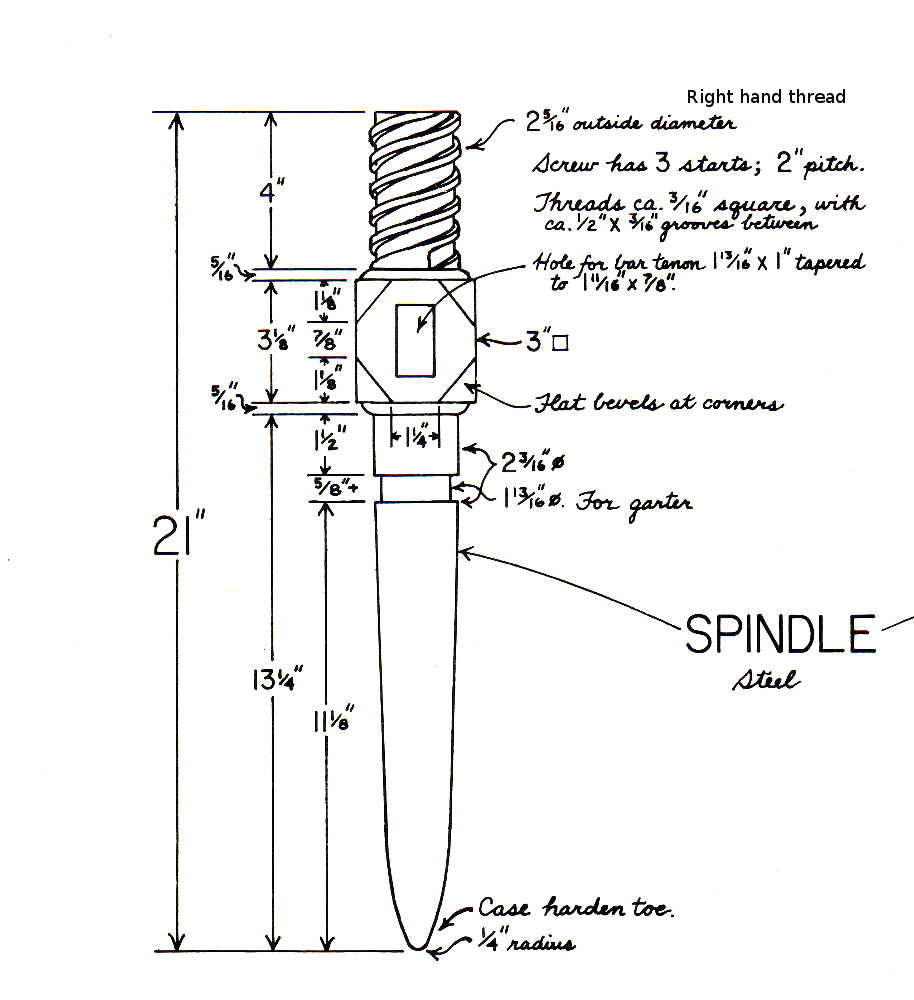 The Spindle Another
major problem we have encountered was the part known as
the "Spindle". The spindle is what presses the platen down
onto the form. Since such a part is nearly impossible to
find, and extremely expense and time-consuming to
fabricate, we are beginning with this old railroad jack. The Spindle Another
major problem we have encountered was the part known as
the "Spindle". The spindle is what presses the platen down
onto the form. Since such a part is nearly impossible to
find, and extremely expense and time-consuming to
fabricate, we are beginning with this old railroad jack. It will not give us the full 3/8"
movement of the platen as we would like to have, but it
will properly move the platen down to the bed and the type
form sitting on it. This means less clearance for the
tympan and packing, but it will be sufficient to let our
frisket move under the platen for for an image to be
struck. It will not give us the full 3/8"
movement of the platen as we would like to have, but it
will properly move the platen down to the bed and the type
form sitting on it. This means less clearance for the
tympan and packing, but it will be sufficient to let our
frisket move under the platen for for an image to be
struck.  Later,
if and when we acquire a proper spindle, it will be a
relatively straight-forward task to replace our jack screw
by modifying the head and the hose - and the lever - to
accommodate the spindle. Later,
if and when we acquire a proper spindle, it will be a
relatively straight-forward task to replace our jack screw
by modifying the head and the hose - and the lever - to
accommodate the spindle.Ideally, we would have a proper spindle as this one, made for Jeff Groves' press project. But this is hard to find and may need to be custom-machined - if time and budget allow. Otherwise, we'll be using the old railroad jack, which only gives us 1/8" vertical motion when the handle is pulled 170 degrees. We really should have 3/8-1/2" or so of downward motion to make this press work properly....
Labor Day Weekend - 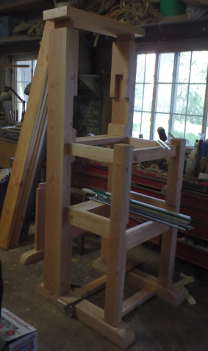 With
the rear posts raised to four feet and braced with upper
& lower side rails, plus the feet, this assemblage has
become quite stable. Even without the pins installed, the
dry mortise & tenon joints make this one solid bit of
wood. With
the rear posts raised to four feet and braced with upper
& lower side rails, plus the feet, this assemblage has
become quite stable. Even without the pins installed, the
dry mortise & tenon joints make this one solid bit of
wood. 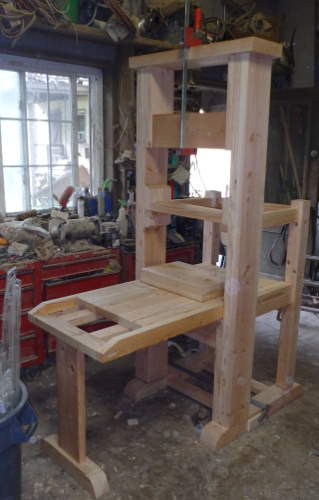 Next
steps were to build the plank and bed, and put them
into place. Now, this is really beginning to look like a
printing press. And darn, is it sturdy. Next
steps were to build the plank and bed, and put them
into place. Now, this is really beginning to look like a
printing press. And darn, is it sturdy. Next, we will build and add the "coffin" - which will hold the stone, the chase and the type form. In the meantime, we'll also drill out the head and cap so that we can insert the long 5/8" bolts (threaded rod on our case) to keep the head firmly affixed to the cap. Shorter fabricated bolts will hold the nut in the head so that it is fixed above our "spindle". The plank, bed and coffin will need to slide under the platen. We used some strips of hard Maple as rails, and cross pieces of hard maple as well in place of the steel rails and cross pieces that were used on the original presses of the era. Well waxed, this should enable the bed to move smoothly into position beneath the platen. Note: This did not work out well. The bed moved, but did not glide. I added additional 3/4" nylon cross strips, notched slightly lower than the maple strips, and set one nylon cross piece next to each maple cross piece., Since the notch on the nylon was about 2 points lower than the notches on the maple, the bed now glides smoothly across the nylon and the Rounce and drum and straps easily move the bed in and out. Next, was to drill out the cap and the head so that the head could be bolted to the cap and locked in place. Two more holes were aligned with the base of the screw unit we will be mounting beneath the head and using to apply pressure. After that, we began building the "hose" - essentially a square box which will hold the spindle in place above the platen, will pass through and be held in place by the "till" and will link the pieces from the top to the platen itself. The platen is that large wooden slab in the photo above. It will be suspended beneath the hose by twine wrapped around hooks on the hose and through eye-bolts affixed to the top of the platen. Once the hose is done and the plank and bed are in place - and moveable - and the platen moves up and down when the screw is turned, we'll turn the large wooden cylinder that will have leather straps attached to allow the "rounce" handle to be turned and move "the coffin" beneath the platen for printing, and back out into the open to allow the form to be inked. By this time, we hope to be able to print something - Update: Friday, September 12 Here's where we are today: 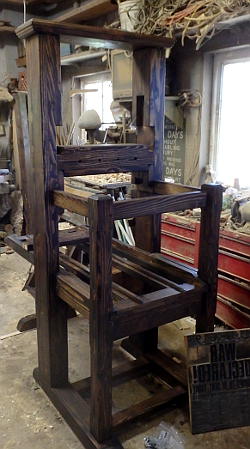 The press
has been fitted and assembled, then dis-assembled for
trim work (routing edges on the pieces, mostly),
sanding, staining & shellac, then re-assembled. Now
the tenons are pinned into their mortises with 1/2"
hardwood dowling, and damn, but this thing is tight -
and stable as a rock. It's great. The press
has been fitted and assembled, then dis-assembled for
trim work (routing edges on the pieces, mostly),
sanding, staining & shellac, then re-assembled. Now
the tenons are pinned into their mortises with 1/2"
hardwood dowling, and damn, but this thing is tight -
and stable as a rock. It's great. 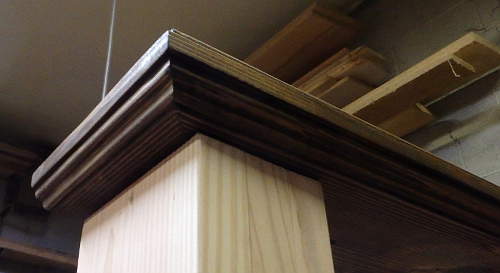 Paul also routed a really nice
molding pattern into the edges of the cap. It looks
"capital", as they say.... ;) Paul also routed a really nice
molding pattern into the edges of the cap. It looks
"capital", as they say.... ;)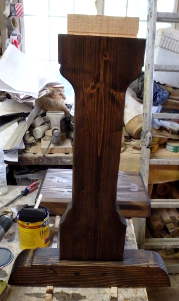 Then we
thoroughly stained and sealed and oiled the wood with
Paul's "3rd, 3rd, 3rd" mix of boiled linseed oil, some
sort of varnish, and I think some thinner of some sort.
We applied it using steel wool pads and it really works
in nicely - the steel wool smooths out the roughness
left behind by the crystalline shellac. Then everything
was wiped down with a series of clean rags, and we've
got a lovely dark, matte finish. I think it looks great. Then we
thoroughly stained and sealed and oiled the wood with
Paul's "3rd, 3rd, 3rd" mix of boiled linseed oil, some
sort of varnish, and I think some thinner of some sort.
We applied it using steel wool pads and it really works
in nicely - the steel wool smooths out the roughness
left behind by the crystalline shellac. Then everything
was wiped down with a series of clean rags, and we've
got a lovely dark, matte finish. I think it looks great.The rounce and drum, shaft and handle are going together. Paul suggested making the drum of a series of wooden disks - smaller grained wood turned to the proper diameter for the leather, with larger diameter plywood disks as dividers- for the *three* leather straps. He made hard wood plywood plates to mount the rounce shaft to the bed. I'll paint the plates and the handle hammered black over stone grain paint to make it look like old iron. We've got bearings on both ends of the shaft and will likely mount it and the handle tomorrow. Got some really neat 4" wide dark iron wing nuts for the head and spindle bolts. I also found some nice 5/8" SQUARE nuts at a friend's shop this afternoon. He buys them by the thousands and uses them to make park benches for NYC... Paul began working on the tympan and frisket today. He's got some hard maple that stays strong, even when thin. Then I finally realized that since it fits *around* the stone and chase, and sets down well below type-high before it's cranked under the platen, there will be plenty of clearance to crank the bed in and out - even with only 1/8" screw movement for impression. What a relief. I hadn't "seen" that yet. I guess my focus had been elsewhere... 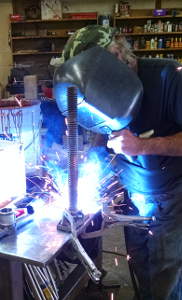 WELDING WELDINGMy neighbor helped me by welding the threaded rod fast into the (formerly loose) "bracket & carrier" - that was on the bottom, but now will be bolted upside-down to the head. They also welded a 1 1/2" threaded pipe collar onto the big wide wing nut so that I could screw in a 12-14" section of 1 1/2" black pipe which fits aound the threaded rod and will press down into a depression on the platen plate. On one of the "wings" of the wide wing nut, we welded a short - 3-4" piece of steel pipe just large enough to accept the big impression rod. Paul's making a wooden handle to go onto the rod. We did bend the main rod down about 20 degrees to make it reachable by the pressman, but did not put the "Z" bend into the end. I would have liked to, but I was already taking too much of their time (& there was some minor mis-communication about just what I needed), so I just let it go. It will be fine. THE STONE Paul made a 1 1/2" thick "stone" of mdf, and I got some granite paint. Tomorrow, I will convert mdf to stone... ;) We made a 33" x 6' platform/base for the press by laminating two sheets of 3/4" hard plywood. Sealed it all around with shellac, and will bolt the press down to it for easier - and safer - transport. note: We did not use
this base. Instead, the press went out as can be
seen in our "Last Pull" photo below. Later, the crew
of Amazing Grace did mount it to a platform - with
wheels - to make it easier to move around the set.
I read over and over how horizontal presses should never be moved in one piece, but this one's wooden - and well fastened with mortises, tenons and pegs and will also be bolted to the larger base. It should be safe to move as a unit. (note: It was - two men to lift was
all it took...)
I picked up some perfectly round 4" fence posts today to use as rollers as we roll it out of Paul's shop and up onto my trailer on Sunday. (As it turns out, we didn't need them. Paul and I easily lifted the press and carried it out the door - in two pieces. Later, when loading onto the truck for Chicago, Bob & I lifted the entire, assembled press and placed it onto the lift gate of the truck. This press is easy to move. Of course, with a 200 pound stone instead of 15 pounds of mdf for the "stone", it would be a very different story... Since we used Doug Fir - and used mdf for the stone, I'm guessing that the weight will not exceed maybe 3-400 pounds. It does move easily - and there is *no* play in any of the mortised-tenoned-pinned joints. They may even want to lift it - hoist it - straight up backstage, and we believe that cargo straps under the head will safely handle the weight. We may add an eyebolt at the forestay end of the base to give them a third lift point so that it doesn't tip as it goes up. No. We decided that the summer & wedges system would give the table and forestay sufficient support to rise with it when the press is lifted with a pair of straps around the head.I would like do a "lift test" before it has to leave, but time is passing quickly... They want to pick it up early Wednesday morning - and take it directly to Chicago. The client saw the work in progress last week and seems to have full confidence that Paul &* I will pull this off. I'm finally beginning to think his confidence is well placed... ;) Update: Saturday, September 13 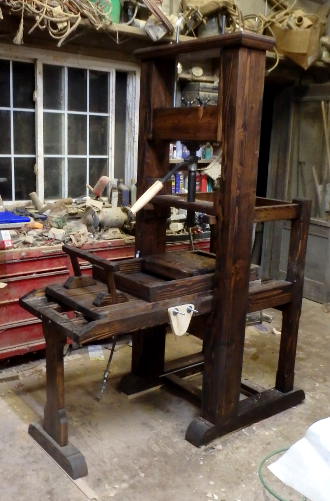 Well, we got the press stained, shellaced and
oiled. We added the impression screw and made a slick
wooden handle to cover the impression lever. Paul built
the frames for the tympan & frisket assembly, and I
began installing the rounce drum and handle. We still have
to set the precise height for the screw contact, and
install the wooden "hose" that will cover the impression
spindle. Well, we got the press stained, shellaced and
oiled. We added the impression screw and made a slick
wooden handle to cover the impression lever. Paul built
the frames for the tympan & frisket assembly, and I
began installing the rounce drum and handle. We still have
to set the precise height for the screw contact, and
install the wooden "hose" that will cover the impression
spindle. Next, we'll affix the rounce drum to the shaft so that it turn as the handle is cranked, then will add the leather straps that will pull the bed into and out of the impression area of the press. On Sunday (it will be sunny after today's rain), we will bring the press back to the print shop for final finishing and testing.. Yes, it looks like we'll have this press ready to send off to Chicago on Wednesday... Sunday, Monday, Tuesday & Wednesday morning -  Hectic,
round-the-clock work on making the table glide more
smoothly, designing and installing, adjusting and fixing
the rounce, shaft, drum and straps & strap clamping
assemblies, affixing the platen to the hose, drilling and
pinning the handle; mounting the tympan, the gallows and
the tympan sheet... and much much, more - some of it more
than once, in fact - until I got it right.... Hectic,
round-the-clock work on making the table glide more
smoothly, designing and installing, adjusting and fixing
the rounce, shaft, drum and straps & strap clamping
assemblies, affixing the platen to the hose, drilling and
pinning the handle; mounting the tympan, the gallows and
the tympan sheet... and much much, more - some of it more
than once, in fact - until I got it right....Monday - call the client and tell him that we need 2-3 more days to finish up. No luck. He cannot budge. The tractor-trailer loaded with props leaves on the 18th. Our press must be ready to be picked up early Wednesday afternoon. Tuesday night, the platen was still not hung. Another early morning run to the hardware store for springs, hooks and other hardware... get it mounted, watch it work. Wednesday, September 17. 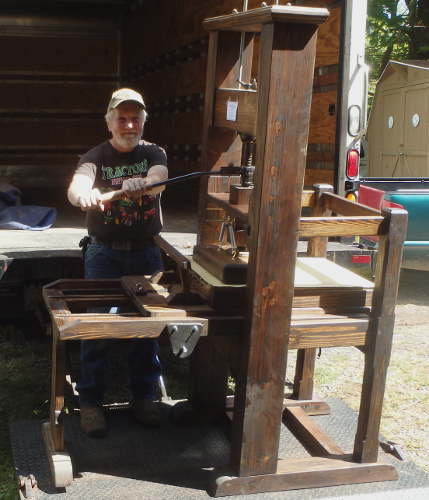 Yes,
we did get it finished - and just in time. The truck
arrived at 2 pm today.The driver patiently waited as I
mounted the sheet onto the tympan. Then, it was time to
"load up". Yes,
we did get it finished - and just in time. The truck
arrived at 2 pm today.The driver patiently waited as I
mounted the sheet onto the tympan. Then, it was time to
"load up". ... but not before one final run under the platen and one "Last Pull" on the lever. I will miss this press and wish that I'd had another week to work on it and do some actual printing. Alas, it's purpose is to serve as a prop for a musical, and it will serve that purpose nicely. Still, I wish we could have done some printing on it before it had to leave.... Soon our first "Wooden Common Press" is on its way to Chicago to astound the audiences of "Amazing Grace" as it does its tour around the country. See blog post. to be continued...
Next Page: Photos and the step-by-step process of building our press. ~~~~~
For further information about
North American Hand Presses, we recommend
Robert Oldham's Field Guide to North American Hand Presses, available for $15 from Amazon.com or from our Fundraising Page For more information on Common Press reproductions:
|
||
|
~~~~~~~~~~~~~~~~~~~~~~~~~~~~~~~~~~~~~~~~~~~~ |