First of all, moving a 1050 -
1500 pound platen press is serious
business. It can be done safely, but
it can also be dangerous both to the movers and
to the press. Most of the presses we find these
days were made many years ago, and the cast-iron
can be brittle - and can break if shocked by
falling over or something like that. And, believe me,
it does happen... but it has never
happened to me - and I hope it never will.
The second thing is that these presses are
heavy - figure 1050 pounds for an 8x12,
1500 pounds for a 10x15 and 2100 pounds for a
12x18. See
press specs
I will not presume to tell you how to move your
press, but I will tell you how I have moved
these presses in the past. I have moved these
presses on a variety of trailers and a few times
using lift-gate trucks. I do NOT recommend
using a lift-gate truck if it can be avoided.
It simply is not safe - no matter what your
refrigerator mover guy tells you. Keep the
press as low to the ground as you can. Avoid
using forklifts, dollies and common cargo
pallets.
I have had
lift-gates fail on me twice - both
times with a press on the gate. Once I was
lucky and it simply went to the ground slowly.
The other time, we had to prop it up with a
clumsy set of jacks and 6x6's and very
carefully lower the backward-tilting lift-gate
to the ground while slowing releasing the
cargo straps that kept the press from falling
off the tilting gate. Both times I had been
told that the lift gates had a 2500 pound
capacity. Both times, they were wrong.
One lift-gate/forklift move that did go well
was with a 4000-pound lift gate on a
large, expensive, relatively new truck. But
use of the truck cost over $250 for the day. I
prefer to spend $30 and stay close to the
ground.
Lift
gates and forklifts are not safe - for you or
for the press.
All but the best-maintained small forklifts
stutter and rock - do not move smoothly. Sure,
they can pick up the press, but then they rock
back and forth and bounce over rough ground. Use a small
trailer and back right up to the door or
driveway you will unload to.
Dollies center the weight into a small
area and can lead to tipping over. Terribly
unsafe. Common cargo
pallets cannot safely handle the
weight. I have seen presses fall through
cargo pallets on at least 4 occasions - none of
which were moves I was in charge of or involved
in.
A low, 5x8
trailer is my chosen mode of transport
for these presses. Safe, secure, inexpensive and
low to the ground. I recommend a low trailer for
every press move. I rent mine from UI-Haul - for
about $30/day...
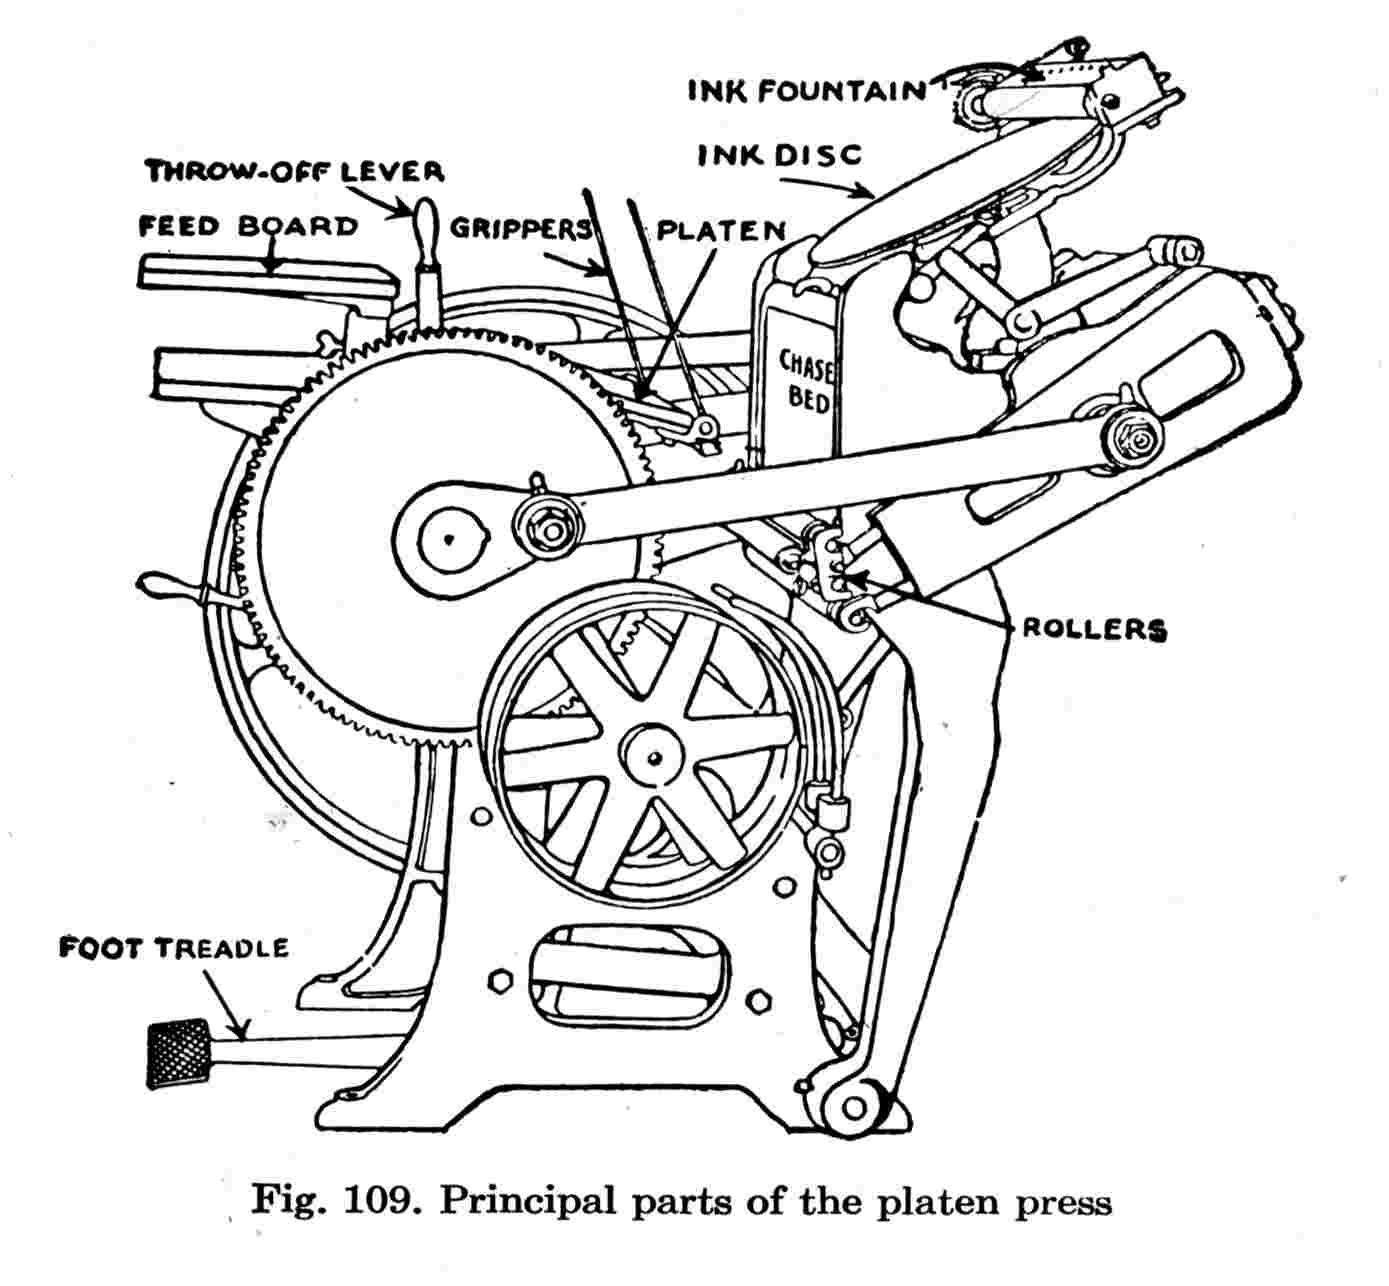
This
report is about moving a New
Series 10x15 Chandler & Price from
the Fieldston School in The Bronx, NY. photo by Carl
Smith, manager of Fieldston Press
|
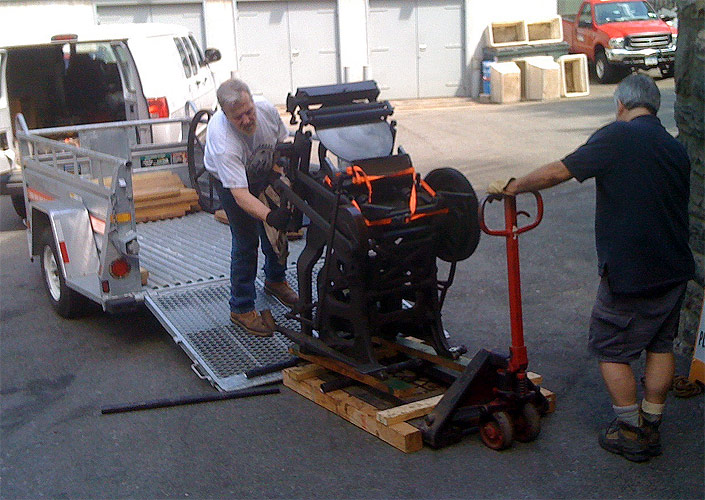
This photo shows the press on a pallet jack,
about to be rolled onto 2" steel pipes which
will ease its loading onto the ramp of the $30/day 5x8
heavy-duty U-Haul trailer. These pipes
can be purchased - cut to size - at Home Depot
for about $6.00 each - a good investment.
We also used two 4' sections of new 6x6 and two
3' pieces of 2x4 and a variety of short 2x4s for
blocking as needed. The fresh-wood 2x6 rails
under the press are firmly affixed with lag
bolts.
Note: Old wooden rails
under these presses are often oil-soaked or
rotten and should
not be trusted. First step in our
moving process is to inspect and/or replace
the lower wooden rails with 2x6s bolted firmly
using lag bolts or nuts and bolts - both with
large washers. See changing press
rails below to learn how I do this.
In this case, we
had to remove the flywheel to fit
through narrow doors and hallways. Removing the
flywheel is not difficult, but is also not
required. If you need to remove the flywheel to
get through a narrow doorway, see my notes below.
The press is
kept closed with a cargo strap. This is
important. You don't want the flywheel to turn
at all - that would let the press open and would
change its center of gravity. Cargo straps are
also available at Home Depot - buy the better
ones; you'll also want at least four to hold the
press in place on the trailer.
Next, note that the press is about to be rolled
onto the wide cargo ramp - by hand. We don't use
forklifts or any other expensive equipment. We
did use the pallet jack to move the press
through the halls of the school - but only
because we had to bring it a long way to get it
outside.
I was able to pull the press onto the ramp by
myself. As it got onto the ramp, we jacked up
the ramp to level using an inexpensive automotive floor
jack - a handy tool to have with you
for such a move. We also laid a 4' 2x6 across
the top of the jack to spread the load and avoid
any damage to the ramp.
Once the ramp was level, I was able to pull the
press onto the trailer - again, by myself. I
used an automotive tow strap wrapped about the
press to get a good grip, moved back a few feet
and pulled. The press rolls easily. We kept
pipes under the lower 2x4 rails to make moving
it easy.
And, by using the pipes, the
press cannot run away from you - ever.
If it rolls more than a foot or so, it rolls of
the pipe and stops. Simple and Safe. I like it that
way.
As the press moves forward and rolls off of one
pipe, I simply removed the freed pipe from the
back, tilt the naturally balanced press back
easily, insert the pipe under the press on my
side, and pull it forward another foot or two
until the other pipe is free, then continued the
process until the press is where I want it. I have moved a
2500-pound Heidelberg Windmill across 100' of
level floor using this technique and highly
recommend it.
This technique does not require strength or
heavy equipment. It requires only logic and
planning.
It is also the safest way to move a heavy item,
because it can never run away from you. The
system has it's own fail-safe brake built
in. Once it rolls off of the pipe, it stops
within inches. Dead stop.
Once the press was in position on the trailer, I
used the small automotive floor jack again to
raise the press - less than 1" - just
enough to remove the pipe(s) that were still
under it.
The press was positioned 3-6" forward of the
trailer axle to balance the load and keep
100-200 pounds of the weight on the
trailer hitch for safety. Then it was strapped
down to prevent any forward moving during
braking, or any lateral movement in the turns.
We tied it down, load up our tools and headed
home... Unloading was even easier than loading,
and was essentially the same procedure in
reverse.
additional notes:
 Removing the
flywheel is generally pretty easy.
Essentially, you need only remove the main drive
gear on the right and three large screws which
hold a collar in place on the left. Once the
gear is removed and the collar is free, the
entire flywheel and shaft can be removed to the
left. If the press has a straight shaft; it
comes right out. If the press has a crank shaft
(good for mounting a treadle) you'll have to
rotate the flywheel a bit to align the crank
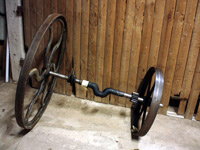
with the slotted hole on the left frame. The photo to the
right shows the flywheel, crankshaft, drive
gear and drive wheel re-assembled for easy moving
around the shop - and to keep the parts
together in one assembly so that nothing gets
lost. Removing the
flywheel is generally pretty easy.
Essentially, you need only remove the main drive
gear on the right and three large screws which
hold a collar in place on the left. Once the
gear is removed and the collar is free, the
entire flywheel and shaft can be removed to the
left. If the press has a straight shaft; it
comes right out. If the press has a crank shaft
(good for mounting a treadle) you'll have to
rotate the flywheel a bit to align the crank
with the slotted hole on the left frame. The photo to the
right shows the flywheel, crankshaft, drive
gear and drive wheel re-assembled for easy moving
around the shop - and to keep the parts
together in one assembly so that nothing gets
lost.
Removing the
main drive gear is sometimes very easy,
other times more complicated. Some presses have
a shield covering the drive gear. When we
encounter a press which has such a shield,
we remove the right side-arm and a few
bolts to get the cover off. If this is the case,
it is very important that the press stays still;
we replace the right side-arm immediately. It is
a very tight fit with almost no clearance or
tolerance. I slip it back on and bolt it back in
place right away. Do not force the side arm back
on. Wiggle the press until it slips back into
place easily and smoothly.
Once the gear
is visible, we use a 3-pound hammer and
a short piece of 2x4 to drive the gear about
1/2" towards the frame. This frees up the shaft
locking key, so that it can be removed and
allows the gear to be drawn back to the end of
the crankshaft for removal. Sometimes we have to
file down the end of the shaft to remove burrs
so that the gear comes off easily. We almost
always finish the end of the shaft with a long
strip of coarse emery paper to make sure it's
nice and smooth all the way to the end.
Once we had to
remove a gear that had been improperly
installed - fifty years ago. In this case the
gear had been driven onto the key- backards! Don't
do that! It took days of hammering a 5' solid
steel rod against the gear from the other side
of the press, and finally a Volvo strut
removal tool to pull that f*)*! gear free.
Changing
press
rails - To replace old oiled or rotten
press rails, remove any nails, lag bolts or
scews holding the press to the rail. I begin by
positioning my new rail next to the old one.
I lay lay one of two 3' 2x4s under the press
frame, across to the other side, and raise the
high end up with small automotive floor jack. As
I raise the jack - carefully, one side of the
press comes up - all I need is 1/2" to slide out
the old rail and slide in the new one. Then I
lower my jack, fasten the press to the rail and
repeat the process on the other side. It takes
only a few minutes to do this very safely.
|
update:
10/28/2016
Preparing For An 8x12 Press
Move
Packing list - what I like to have with
me for a press move.
(I'm going down to Virginia in a few days to
pick up and 8x12.)
Here are my notes and my packing list:
First: arrange to Rent 5x8 U-Haul utility
trailer for $40/day (total cost)
Tools & stuff I might need:
1) 3# hammer to drive gear in towards frame
1a) short 2" drift or 18" 2x4 to help drive gear
inwards
2) crowbar, nail-remover or claw hammer - to
remove gear key
3) large screwdriver to remove main shaft collar
4) large adjustable wrench to remove side arm
nuts
5) small tools to remove feed & delivery
boards
6) 2x4 rails to replace old rails if needed
7) lag bolt set for new or old series press
(3/4" or 1 1/2"?)_
8) floor jack to raise press & trailer ramp
9) 2-3 pipes to roll press on
10) 8' ramps plus longer planks (in case needed)
to make ramp up stairs
11) come-along to pull press or secure press
12) chain hoist to pull and/or secure press
13) power winch & cable to use if needed or
practical
14) cables, chains, etc. to pull press
15) heavy-duty tie-down straps to hold press in
place
15) wood pieces to block press into place on
trailer
16) electric saw to cut planks if needed
17) hand drill to start lag bolts in rails
18) wrenches to tighten lag bolts in rails
and, if press is to be separated into bed &
platen+frame:
19) rope to gently lower bed
20) 1" drift to remove back shaft
21) broom stick to drive shaft all the way
through
spare wood for all sorts of things...
22) small tie-down straps to keep press closed
in transit.
23) can of oil if needed to grease the rails for
dragging up the ramp.
24) tarps and rope or straps - just in case it
rains or snows...
25) File to remove burrs from gear side of shaft
- to help gear slide off
26) spray can of oil... You can never have too
much oil available.
27) Sockets, wrenches & screwdrivers...
28) tape measure
Note: I remove the ink disk before hitting the
road. I like to carry it in the truck. These
disks are cast and are heavy. They can break if
shocked - like falling down onto something hard
from 3-4' height. Save your disk replacing them
is next to impossible - or at least likely to be
hard to find and very expensive. Making a new
one can cost $3-400.
|
,
~~~~~~~~~~~~~~~~~~~~~~~~~~~~~~~~~~~~~~~~~~~~
Please contact Alan Runfeldt with other
questions using this convenient and spam-free
contact
form
page
last updated June 4, 2011
October 28, 2016
|