Restoring
the
Vandercook Model 099
Ball-Bearing
Galley Proof Press
|
 |
~ 12x16" Form size ~ Sheet & bed
13x22" ~
weight: 110 lbs. |
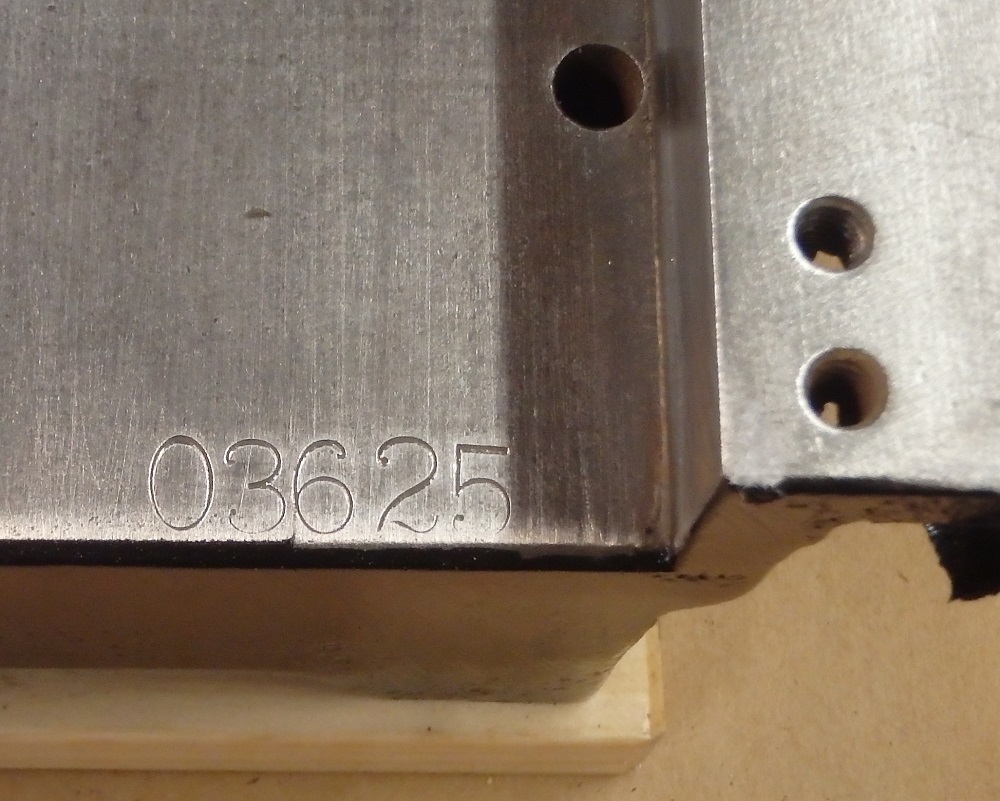
Serial
Number 03625 |
This is a
work-in-progress, begun on August 4, 2017.
Photos will be added as we perform the work
described in the paragraphs below.
update 6/18/2019
This press is now completed and in its new home in the
Printer's Cabin at Robert Frost's "second home"
- the Middlebury BreadLoaf School of English in
Vermont.
The
Vandercook Galley Proof Presses
were designed only for pulling galley proofs
- typically lines of text cast on the Linotype
or forms comprised of Luldow slugs and/or
foundry type and/or photo engravings, made
up for display advertising.
But these days, they can be used for far more
than that. As a result, they are in demand as a
small, portable, easy-to-use flatbed press.
Most of the old galley proof presses turning up
these days are really quite old - and the rubber
coating of the impression cylinder is often
either hardened beyond the desired hardness of
70 Shore Durometer, or worse yet, damaged from
many years of rough use.
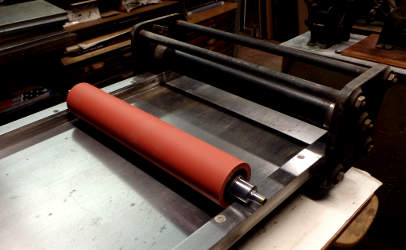 The good news is that this roller
can be removed and recovered. We had our
Vandercook Model 099 Impression Cylinder
recovered by our friends Andrian and Jayne of Ramco
Roller in San Dimas, California - and it
looks beautiful! The good news is that this roller
can be removed and recovered. We had our
Vandercook Model 099 Impression Cylinder
recovered by our friends Andrian and Jayne of Ramco
Roller in San Dimas, California - and it
looks beautiful!
The other issue with the galley proof presses in
general is that most of the presses we find
these days lack the optional parts that would
allow locking up a form in the bed of the press
- the ends are open. Few have the optional paper
guides and grippers as well. They were meant to
print forms held in place by magnets - or in a
locked-up chase - which is fine for a galley
proof, but no good if you plan to print more
than just a few copies of the form.
For that reason, we add a wooden cross-bar to
the back and another on the front. This gives
you a fully-enclosed form area and allows you to
lock up your form - type, engravings,
photo-polymer plates - using standard
letterpress furniture and quoins.
The last important improvement we make to these
presses when we restore them is to add our own
paper guide system that will let you hold your
sheets in place with sufficient accuracy to do
multiple passes - in register - for doing
multi-colored printing.
|
Procedure we follow to restore
The
Vandercook Model 099 Galley Proof Press
Disassembly
The first thing we did was to fully
disassemble and remove the impression cylinder
unit, which is basically the only standard
moving part to this press. We sent the rough
old impression roller to Ramco Roller in
San Dimas, California, who do an excellent job
of recovering the roller shaft. The result looks
like brand new.
The impression unit contains bearings that ride
beneath the rails. These were soaked in
penetrating oil, cleaned and re-installed.
Our sand blaster is not in service at the new
shop yet, so we used power hand tools to remove
all old paint and rust. We took it all down to
shiny metal, then painted the base - top and
bottom, and painted all other parts and set them
in our paint cabinet at 80 degrees to cure for
two days.
Then we removed the four rubber bumpers on the
ends of the rails and replaced them with new
ones we made here.
The bed and rails were thoroughly de-rusted and
the surfaces made to shine, then liberally
coated with Mineral Oil, which was rubbed in to
give these bare steel surfaces protection from
humidity.
These presses typically
develop a light coating of surface rust
on the first warm humid day of the
spring when the press is still a bit
"chilly" from the previous night's
chill. When the hot, moist air hits
the bare, cooler steel, moisture
condenses on exposed surfaces and they
can become covered with a find surface
rust in mere hours.
|
The underside of the bed was cleaned to bare
metal, then painted "Vandercook Black"
The old wooden rails attached to the bottom of
the bed and the old pegs that they were fastened
to were removed and replaced with new ones.
Cleaning:
Some parts are best cleaned by sand-blasting
or wire-wheel. Machined surface areas are best
cleaned using medium-grit foam sanding pads and
Coarse, then Medium Scotch Brite pads. We don't
use the less-expensive no-name brands since they
do not appear to have the coarseness and
strength as the standard Scotch Brite green
pads.
Painting:
After all parts were cleaned to bare metal,
those parts which were to be painted were given
two coats of Rustoleum Ultra-Cover Black, then
either baked in the sun or cured in our paint
cabinet at 80 degrees for two days.
All bare metal parts were masked off for
painting, then coated with mineral oil when the
paint was dry and cured.
Re-assembly:
Re-assembly, as they say is pretty much the
reverse of dis-assembly. First, we reassembled
the impression unit - on the press. Bearings
were adjusted using the cams on the underside of
the unit.
The bumpers on the four corners were
re-installed.
At that point, the restoration was pretty much
done. Next it was time to add the Paper Register
Device and the Two-Roller Inking System.
Now we have converted our simple little Galley
Proof Press to a min-Flatbed press.
 Test
Prints: Test
Prints:
The last step in this process was to do some
test prints and "get to know" the press and
confirm that it prints just as well as we
expected it to. It does...
We had already tested the Register
Device and confirmed that it does indeed
produce dot-for-dot register. We also used the
new Inking
System and printed some large and small
samples; it inks well.
Pickup and Time to Head to its new home...
After all the work was done, there was
nothing left but to hand it over to the client
and send it on its way to a new home at the Book
Arts Center in Vermont...
 The
press can be seen in the photo to the right with
the inking unit in place and some steel galleys
on top for travel in the back of the client's
Gas/Electric Hybrid Prius... The
press can be seen in the photo to the right with
the inking unit in place and some steel galleys
on top for travel in the back of the client's
Gas/Electric Hybrid Prius...
|
page
last updated
August, 2017
|
