The Excelsior
Chase-Base grew out of a need for a
better plate mounting system for small table top
presses. The Excelsior Chase-Base will enable the user
to mount a larger plate - and print a larger image -
than would normally be available using other base
systems on small hand-operated table top platen
presses.
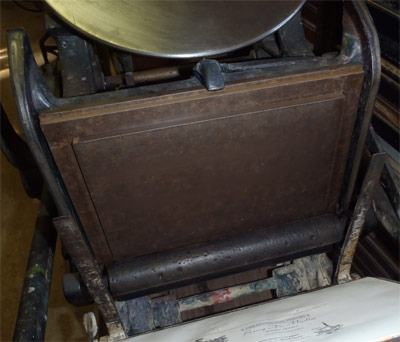
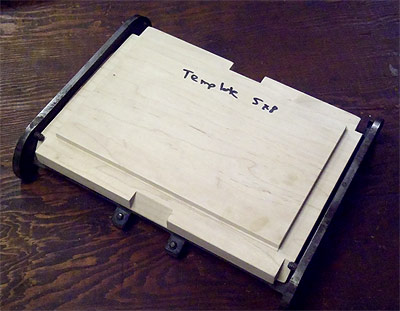
To order an Excelsior Chase-Base - see our fundraising page For example: A square base must be locked up inside the chase. Therefore, many folks are limited to using a 3x5 base on a 5x8 press, a 5x8 base on a 6x10 press, a 6x9 base on a 7x11 press, etc. However, with The Excelsior Chase-base, the entire inner chase dimension image area is available for mounting a larger plate. In other words, The Excelsior Chase-Base supports an image size equivalent to the inside dimensions of the chase that came with the press. The image area of the plate can actually be 5x8" on a 5x8 press, 6x10" on a 6x10 press, 7x11" on a 7x11 press, etc. Before the Excelsior Chase-Base was developed, this was not possible on most small presses. The Excelsior Chase-Base is called a "Chase-Base" because it is a plate-mounting base that entirely replaces the steel metal chase (frame) that was traditionally used to hold the type form - or to hold an undersized plate base. When using an Excelsior Chase-Base, no chase is needed. The Chase-Base is made to fit into the bed exactly as the original chase did. However, it is important to note that The Excelsior Chase-Base does NOT allow a small press to print like a large press; it does nothing whatsoever to increase the impression or inking of a small press - which are, indeed major limitations. What it does do is allow the user to mount a larger plate - which will cover a larger area. Please see below for more on this subject: Deep Impression on Small Platen Presses
Cost Considerations Considering the cost of used chases, furniture, reglet, quoins and keys, for printers wishing to only print with photo-polymer plates, the Excelsior Chase-Base offers a financial benefit as well. With the Excelsior Chase-Base, you need only a plate and some gauge pins. There is no need for a Chase, for furniture, reglet, quoins or quoin keys. Using Gauge Pins or Paper Guides As of this writing (2012), Megill's Flexible Gauge Pins were the only type of commercially-made gauge pin that can be used with no fear of them being damaged - or damaging your base. These Flexible Gauge Pins cannot be crushed by any base; they simply lay flat when pushed down by the base. Three of these pins should last anyone quite a while and they are included in the Chase-Base Kit. Paper guides can also be used. However, any guides that are used must be lower than the thickness of the Photo-polymer plate. Megill's Flexible Gauge Pins are perfect for this application. However, since the fire at the supplier's warehouse, Megill's Flexible Gauge Pins are no longer available. Paper Guides To solve this problem, we have created our own Cushion Quad Guide - The Excelsior Cushion Quad Guide cannot be crushed; it is cushioned so that when the plate base is pressed against the platen, it will gently compress and cause no damage - to itslelf or your plate or base. Extension Feed Guides Another neat trick is to fit Extension Feed Guides \ to the lower bales of your platen. On most presses, this allows the gauge pins to be set as much as 1 1/4" below he lower edge of the platen. That means you can feed a larger sheet and still position your image near the center. Wood, Metal or Richlite? When we began using BASF Photo-Polymer plates, back around 1980, we used old engraving bases to mount our plates; we would simply remove the old metal engraving, sand it smooth, flip it over to the even smoother side, sand some more, and mount our plate. It worked fine for us for many years. Occassionally, the adhesive would splinter the plywood as we removed the plate, ruining the base. But so what? We had many boxes of old engravings to scavage from, so it was no problem. However, we we began to make bases for others to use, we realized that we needed a better material - one that would not splinter. On the bottom of one the old engravings we had in the shop, we found the name of the supplier of the wood it was mounted on. We called the old phone number and were pleasantly surprised to discover that they were still in business (some 30 years later) and would sell us the photo-engraving mounting wood they supplied to those few photo-engravers who were still making metal plates. It was great and we began making Chase-Bases. Unfortunately, word leaked out to the public from some enthusiastic users and the orders began to flow in even before we were ready for them. We had to take time away from our printing and other projects to make chase-bases. Although the finished bases were perfect and well-liked, we had trouble keeping large planks of blocked Cherry in stock and dry enough to prevent warping. Although we never lost a base, since they were all oiled or otherwise sealed during production, we lost a lot of very expensive wood stock. It was a problem. One of our students came to us with a piece of odd material; it wasn't plastic, it wasn't metal; it wasn't wood. After months of research, we discovered that it was a phenolic resin laminate developed for making aircraft parts for the Boeing 707. These days, it has become popular to manufacture faux-granite counter tops. It also makes a great Chase-Base. We also considered aluminum, but the cost of milled aluminum plate would have made the Chase-Base cost over $200, while offering little if no benefit over the other materials. We wanted to keep the price reasonable. And we have. Even with the new material, any small table top platen press can have a pefect, resiliant Excelsior Chase-Base for somewhere around $100. Grid or no grid? The popular gridded photo-polymer plate bases are quite popular - and are very handy when mounting a plate to be printed on a Heidelberg Windmill Platen Press or a Vandercook or similar Flatbed Cylinder Proof Press. However, they are useless on a hand-fed table top platen press. The plate can be mounted into perfect position quite easily using no lines of any sort at any time in the process. (It's even easier than setting traditional gauge pins to match the image position of a locked - up metal type form.) Setting Grippers It is very important, that when using The Excelsior Chase-Base, your paper grippers are set all of the way out to the sides of the form. Otherwise, they will contact and damage the Base. Make sure your grippers are out of the way before closing the press on the Chase-Base
(Read through this section twice - until you fully grasp the procedure it describes.)
Yes, it really is that
quick and easy! - faster and easier than any other method we are aware of. for
use with Photo-Polymer Plates and any base
The
importance of a level platen - set .918" from the
bed - and ink rollers set to ink the plate, but
not touch the base, cannot be
over-emphasized.
It is important that platen be level and set to .918" at all corners. (Do NOT assume that your platen is level OR set to the correct height, even if "it's been used that way for years". We find many presses with platen-height issues.) You can use the popular "Vandercook Lollipop" (or a copy) or John Falstrom's two-point adjustable Lollipop, OR the Excelsior Press "Xx" photo polymer plate, made specifically for the Excelsior Chase-Base. (For metal type users, we can also supply cast Xx Ludlow slugs which can be locked up in a form like type.) In our restoration shop, we use the orginal platen leveling gauges made for the Kelsey Company. If you have a Kelsey press, built between 1960 and 1990 or so, chances are that its platen was leveled using the gauges Mr. Gene Mosher passed on to us a few years ago. To the best of our knowledge, these are not yet commercially available. Platen presses use a variety of bolt arrangements to adjust platen level and height, but they all essentially do the same thing - they let you adjust the pressure on all four corners of the platen. Lolliops can be inserted at the corners as the bolts are adjusted. Our "Xx" photo polymer plates can be mounted on the corners of the Chase-Base and used as contact points to gauge pressure. A strip of strong index makes a good "feeler gauge" to be used between the plate and the platen. Adjust until all corners apply identical pressure when the platen is closed, and you will be in good shape. Roller Height: On the issue of roller height and pressure and roller deflection, it is helpful to understand that type is more forgiving than metal or photo-polymer plates. Type's face is deeper, spacing material used with type is low, so a metal type form will accept more roller pressure (& roller deflection) than any popular plate material. Proper roller pressure is critical to proper ink transfer - to the face of the plate image - while avoiding inking of the background base material. If your rollers ink the Chase-Base - or the background image of the plate material itself, you will need to raise the rollers until the rollers ink the form while leaving the background clean. Many folks like to tape the rails to raise rollers - and that technique works okay on larger platen presses with 1/2" wide rails, but for all smaller presses - with narrow rails, we recommend that the trucks be taped to increase their diameter to be exactly the height needed to transfer sufficient ink to print - without inking any non-image area. We have found that the best tape to use is black vinyl electrical tape. We exlpain this techinque at Taping The Trucks |
|||||||||||
|
~~~~~~~~~~~~~~~~~~~~~~~~~~~~~~~~~~~~~~~~~~~~ |
|||||||||||